

Janty has been known for producing top quality products and now they’ve produced yet another, the Janty MiD. Janty has introduced a unique way of vaping with stellar technology and a ground breaking software design that will change the world of vaping as we know it. So you think you’ve seen advanced vaping? – Meet the Janty MiD.
(Being that the MiD I received from Janty is just a prototype and will undergo design changes, Janty has asked me to review only the MiD’s functionality. The MiD’s design will be reviewed once I receive the finished product – which will be the second part to this review.)
At first receiving the MiD, I quickly learned how advanced the device is, yet at the same time understanding where it lacks. From the start of using the MiD, I was completely frustrated and have never ran into a more difficult device to use and understand. From the moment I pulled the MiD One out of its boxing, it honestly made the “Guide To Vaping” feel like it needed a guide to vaping the MiD. Of course, me being the man who I am – I skimmed through the instructions and siding with my normal approach of just figuring it out as I go along. With the MiD, that isn’t possible.
The MiD requires extensive instructions to achieve using the most simplest of vaping options we’ve all become used to. The reason why the MiD is so difficult, is because it doesn’t have a screen and merely relies on a light sequence from its bright multi-colored LED. With that being said, I started out very confused with this device. The internal features it offers is very advanced and futuristic in the world of electronic cigarettes, but with it not incorporating a display screen, it felt as if Janty has taken a step back and went into the morse code era. Completely stumped to say the least, right?
Never have I received a device that utterly stripped me from everything advanced vaping that I’ve known. But again, with the MiD – it’s far from being your typical mod or advanced personal vaporizer for that matter. That is until I read the instruction thoroughly. Once I fully read the instructions and grasped that the MiD is quite the learning process, I immediately began to not only use the device efficiently, but I also started to have a little fun with it too.
I was still left with a puzzled understanding to the MiD’s in-depth light sequence of a menu. – Until I talked with Ludo; founder of Janty.
- Question – Blake: It’s tough running on light sequences, rather than just being able to tap over once or twice to change a profile. I understand your reasoning of no screen, but it’s almost needed with such a system the MiD runs. Checking something so simple as the resistance on the MiD takes a learning process and memory – why?
- Answer – Ludo: The question is, why the need for checking the resistance on the go? – Since you created a profile for vaping for your atomizer, this profile is perfect for that atomizer and the resistance does not change while you are on the go…
You knew the resistance when creating the profile. Once the profile is created, you save it and execute it on the go, no need to look back. The MiD is not a Variable Voltage device. The MiD is a creation beforehand and an execution on the go. Once on the go, no need to check anything.
After speaking with Ludo over a course of time, it started to become a bit more clear. I had questions and concerns about the MiD and they were being answered in a way I haven’t thought of. The MiD One isn’t an on-the-go fiddly device and if you take a moment to really think about it – why do you need to check these options on-the-go… if you already know them? The MiD is a fun tool and an advanced personal vaporizer to customize your vape beforehand on your PC. You create profiles specific to the hardware you’re using and you test profiles to try out your hardware to find the perfect mixture of settings for your vape. When you’re away from your PC and not in the “garage”, you execute your work and take the benefits of your atomizer, cartomizer and e-liquid specific profiles.
It’s a sad truth to those who want the fancy display, but to those who don’t care for it and are still out on the prowl for that perfect vape, here’s the perfect vape – actually… here’s ‘your’ perfect vape.
- Question – Blake: What about the market? – How do you think they will take to the MiD? – How do you plan to sell the MiD to someone who isn’t as advanced or can’t comprehend the MiD’s advanced features?
- Answer – Ludo: The market is perfect. You don’t need to create profiles… simply go to MidSeries.com and download the top 10 profiles and be lazy and just vape on what the pro’s tell you is the best. Simple, no? – Download, Execute, Done!
- Question – Blake: Taking the MiD right out of the box and using it right away like you do with other PV’s isn’t exactly how this all works, which was my first impression. Do you agree that the MiD isn’t an out of the box type device?
- Answer – Ludo: After a week or two, it all comes together and you’ll use it fluently. It is not an out of the box vape. It’s not an ego with a simple switch that fires at 3.4 volts. This is a Photoshop for vapers.
After only a few days, I’m now using the MiD with ease. Creating profiles, toggling through profiles and installing MiDSeries Community profiles has become like second nature. As much as I hate to call it this, the MiD is like a toy for the vaper. Even though the PC software is very advanced, it’s very fun too. Creating profiles went from being serious to what kind of light show can I make next. Many of you may think “Well, I’m not looking for fun. I just want a device that vapes great.” – My answer? This device can produce a great vape… if you create it (or download it from MiDSeries.com).
MiD Series Community
The MiD Series Community plays a huge role with this device. There’s nothing like being able to share your specific settings for specific atomizers, cartomizers, ohms, e-liquids, voltages, wattages, ideas and experiments. If you’re new to the MiD and aren’t as fiddly with creating profiles (although it’s very easy or unless you don’t have MiD Pro), navigating to MiDSeries.com has become a source for many user-created profiles. As the MiD officially launches for the public, I can see the profile gallery tripling within a month. The ability to add friends and contact other vapers in the MiD Series Community is awesome and a great addition to the site.
Uploading a profile to share with others is very simple and very specific. When you share a profile with the community, you want them to get the exact vape you did – and with the MiD, it’s very possible. When uploading a MiD Profile, you are asked every aspect of your vape so that when others are on the site looking for a perfect vape for their Boge Cartomizer, they can find it by looking at the information you included with the upload.
[youtube id=”Cs-KwDYKz70″ width=”600″ height=”350″]
Not only can you upload and download user-created profiles, but you can also see the latest MiD Series members and interact with them. Adding a vaper is easy and you can also manage your “connections”. Don’t hold me to this, but I believe you’ll also be able to add a status or chat with other MiD Series members on the site soon. (Maybe that’s just my hopes?!) – In addition, you can also purchase modules for your MiD device by going to the MiD Store. Each module is an extra cost and each gives you different advantages or options. To skip purchasing each module one by one, you can purchase a package of Platinum, Power or Dynamic.
Platinum Package
- Module 1: Vaping Profile Programming
- Module 2: Extended Threshold Limits
- Module 3: Realtime Vaping Enabler
- Module 4: User Defined Realtime Speed
- Module 5: User Defined State Color
- Module 6: Vaping Profile In RMS
Power Package
- Module 1: Vaping Profile Programming
- Module 2: Extended Threshold Limits
- Module 5: User Defined State Color
- Module 6: Vaping Profile In RMS
Dynamic Package
- Module 1: Vaping Profile Programming
- Module 3: Realtime Vaping Enabler
- Module 4: User Defined Realtime Speed
- Module 5: User Defined State Color
- Module 6: Vaping Profile In RMS
Profiles
Profiles are the specific user created settings. Creating a profile is very easy once you start to ‘get’ how the MiD works. You can either create a profile with the MiD Base or MiD Pro.
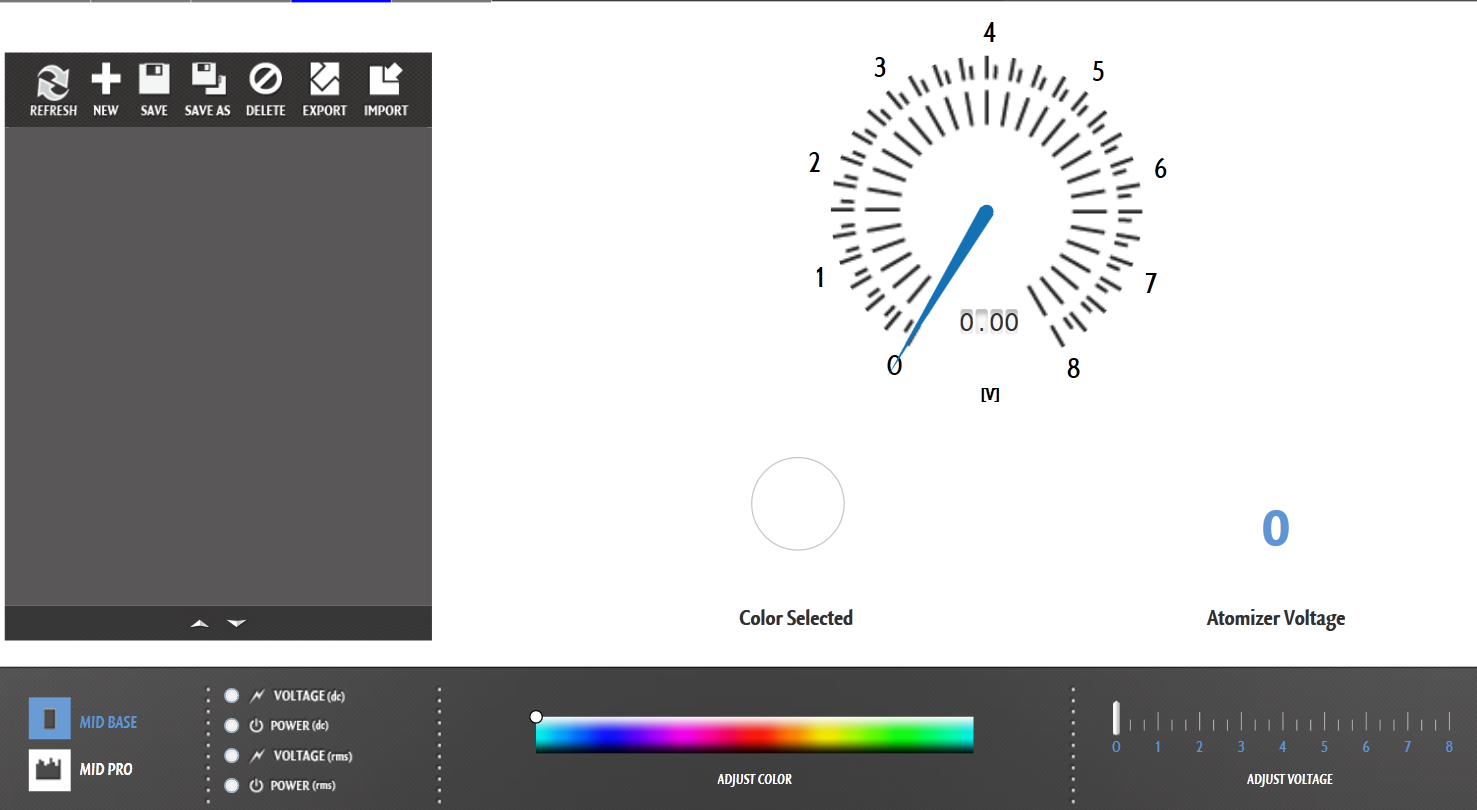
MiD Base
MiD Pro
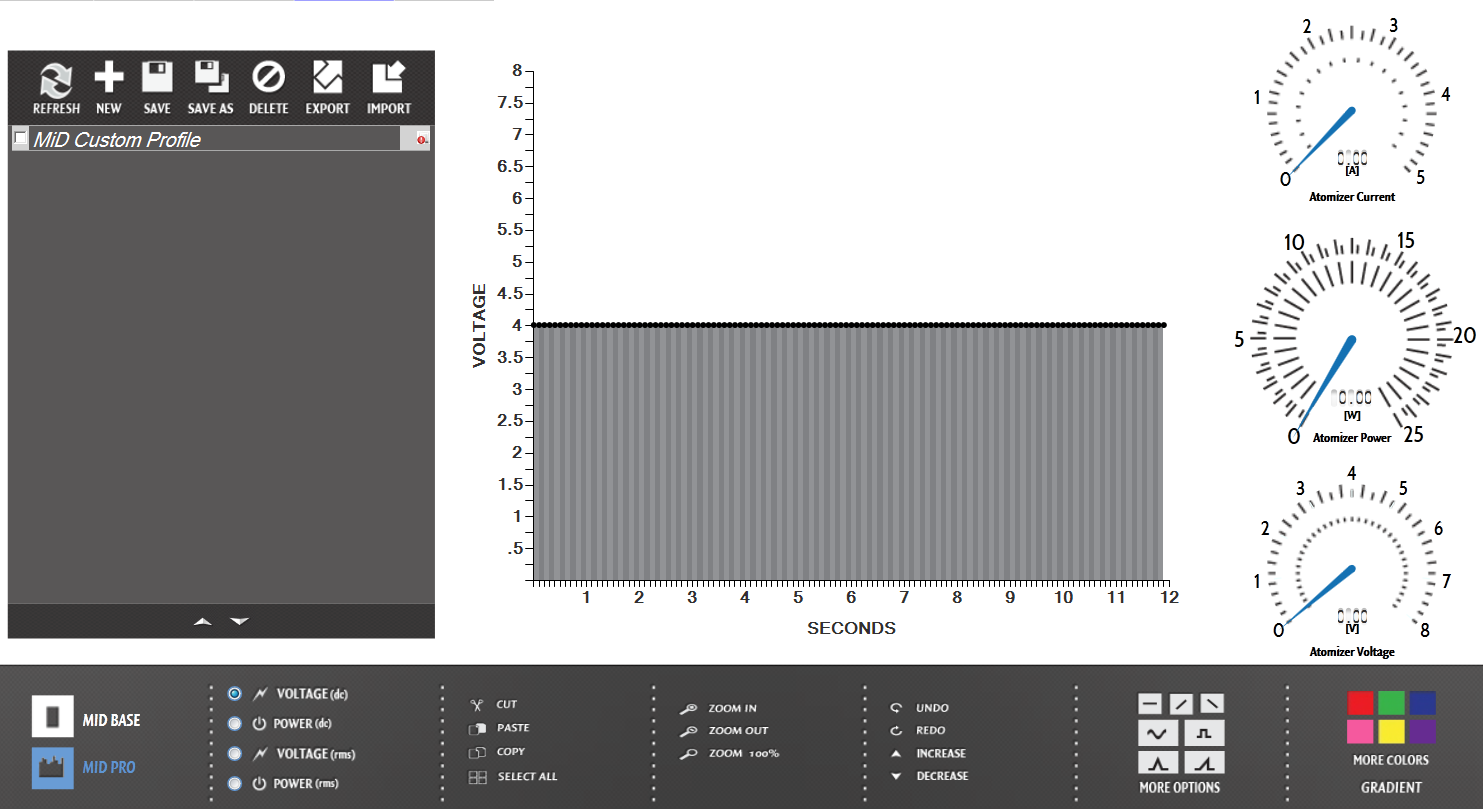
Creating a MiD Base Profile is as simple as it can get. Choose a preferred voltage or wattage, a color and you’re all set. Creating a MiD Pro Profile is a bit more complex. MiD Pro is complete customization to your vape. There is a timeline you can edit from 0.1th of a second – This includes voltage, wattage and your desired color that you want the LED light to display.
Predefined Options
Janty has made some of the options as user-friendly as possible (go figure!). The timeline can easily be made with options that have already been built for you, like a slant, a pulse and many others to choose from. With the MiD, you have so many options to customize, so even using the predefined options, you can put together to make one wicked vape. Look below for an example of how I put together the predefined options on my timeline.
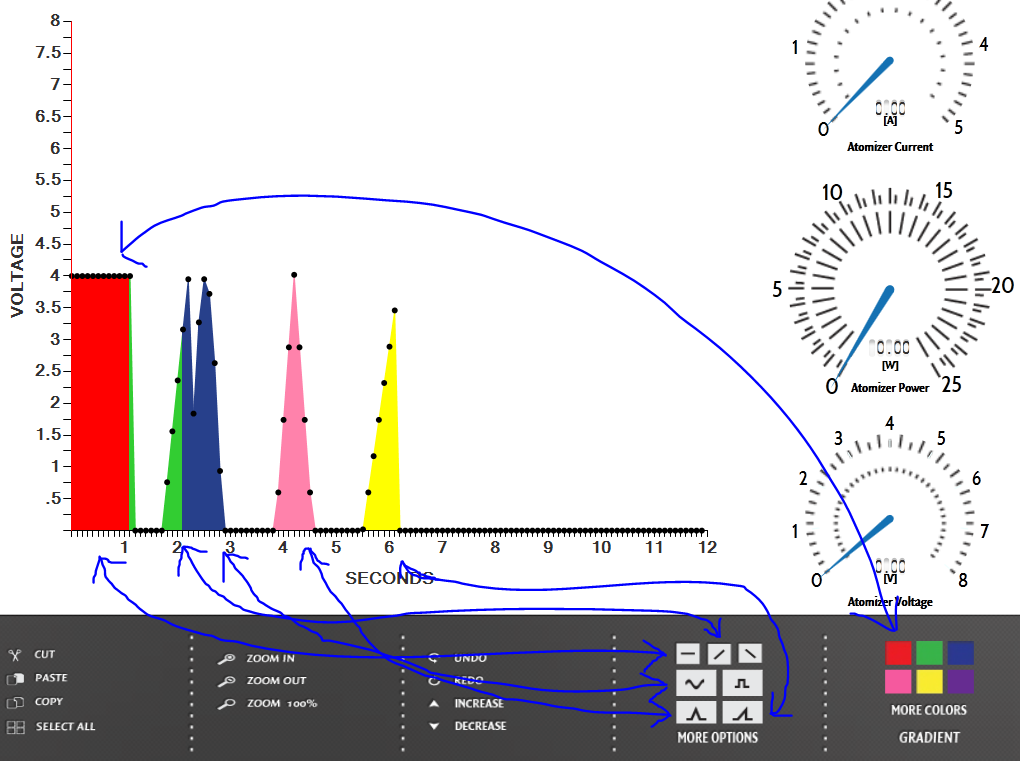
As you can see in the above picture, I’ve used some of the pre-defined curves the MiD Series PC Software comes with. You can use just one if you would like, or use multiple in the same timeline. There are more timeline options listed under “More Options” as well. In the above picture you can also see I used multiple colors in my timeline. You can make any part of the timeline a different solid color, or you can choose from the many pre-defined gradients.
Creating a profile looks like there is a lot that goes into it, but there really isn’t. Creating a profile is easy, even some of the most advanced looking timelines may look like there was a lot of work that went into it and some may when testing – but creating a quick customized profile is much easier than you think. Below is a video example.
[youtube id=”dEqbZYM-Gn4″ width=”600″ height=”350″]
As you can see in the video, I created a quick and easy – but customized vaping profile. I used the Voltage RMS option, a pre-defined curve for my timeline, the black to white gradient, a solid baby blue, the white to black gradient and the red to green gradient. Now, in the video for that profile, my voltage reaches a peak of 8 volts. You can easily change what the max voltage reaches. I could go on and on about what you can do and how many ways you can make your profile, but for times sake, I’ll let you take a nab out of it for yourself. As you can see, creating profiles is very simple, yet at the same time being very advanced and fun.
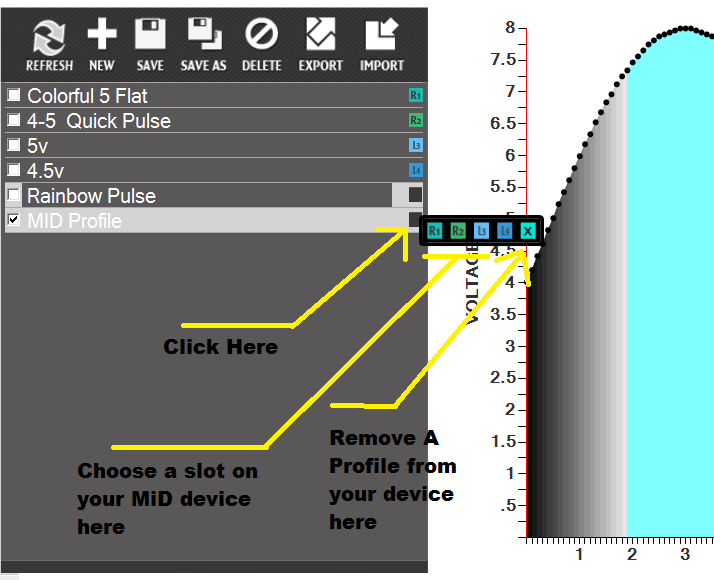
Placing A Profile On The MiD Device
To place a profile on the MiD device, it’s as simple as choosing between your 4 profile options available on your MiD One. Your MiD One device has 4 slots you can fill with profiles – Right 1 (R1), Right 2 (R2), Left 3 (L3), Left 4 (L4). Once you create a profile, you can look to the left of your MiD PC software to add and remove vaping profiles in the 4 slots on your device.
Just when the MiD looks too advanced, its features like this that puzzles you again with the “so advanced, yet so simple” thought. There are many more options I can go through, but remember – this is a review, not a guide. If you’re interested in learning more about MiD Profiles, there will be guides on using the MiD PC software at a later date. If you don’t want to wait – try reading the MiD PC Software Manual. (lol!)
Though it can look very confusing from a first impression, once you learn the basics to interacting with the MiD PC software, it all seems to fall in place.
MiD One Device
Though the MiD is a very advanced device, its navigation isn’t. From the first of its kind, the MiD uses a joystick style button, much like you would see on a Playstation or Xbox controller – just a lot smaller. Each direction on the joystick is used for a part of the MiD’s menu system, but remembering everything can be quite the hassle. To be honest with you, it’s an ease for me because I don’t even acknowledge the other options like checking battery life, temperature and so on. As long as I know how to switch between vaping styles and toggle between profiles, I’m good to go.
Vaping Style Switching
Switching between vaping styles is one of my favorite options to use. The two options for vaping style switching is Standard and Real Time. The ability to not only use your vaping profiles on the go is awesome, but when you don’t want to play by the books and just want to ‘free style’ it, then that’s where my favorite comes in – Real Time Vaping.
Switching Between Vaping Styles: Entering the menu…
- To enter the menu, push the joystick 5 times to the right.
- The LED will blink blue once, pause, then will blink blue X amount of times. (1 blue blink = standard vaping – 2 blue blinks = real time vaping)
- To change between the two, push the joystick to the left once to select real-time vaping or push the joystick to the right to select standard vaping.
- Once you are happy with your choice, push center on the joystick for more than 1 second, and the LED will light up green and exit to normal usage mode.
Standard: The Standard style vaping is the most common and will be used when using your created profiles. The ability to switch between multiple profiles is great, especially when your eyes are glued to the computer screen like some mad scientist creating the latest work of art – or as we call it in the MiD Series Community, a vaping profile.
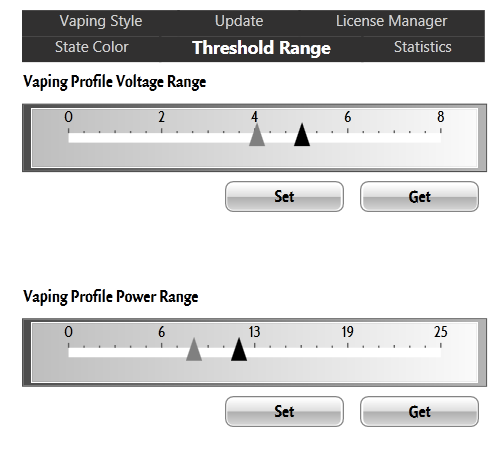
Threshold Range: The Threshold Range is the highest and lowest amount of voltage or wattage you want when using the Real Time vaping option. This threshold range makes it easier to stay between your perfect vape and safer on your atomizer/cartomizer, so you don’t pop a coil. When Real Time vaping, you can set the lowest amount of voltage or wattage you would like to vape at and the highest. Still not satisfied with the highest or the lowest? – This is when we go free style, or for more correct words… real-time. Continue reading!
Real Time: This feature is awesome and possibly my most favorite on the MiD. I do love creating and using my own profiles, but sometimes I just like to wing it, so to speak. I don’t want boundaries, nor limitations – I want real-time vaping, my movements, my choice – all on the go. Why should I have to settle with vaping set profiles or set voltages or wattages? – With Real Time vaping on the MiD, you don’t have to settle for anything. You have the choice, it’s all user defined.
- Up: When in Real Time, pressing the joystick up and holding it will start your vape off in the middle of your threshold and will climb to your highest threshold limit. If you’ve set your threshold limit to 6 volts, it won’t go above it.
- Middle: When in Real Time, press the joystick button down and holding it will start your vape off in the middle of your threshold and will stay steady at that voltage or wattage. If you’ve set your threshold from 4 volts to 6 volts, the middle will stay at 5 volts steady.
- Down: When in Real Time, press the joystick down and holding it will start your vape off in the middle of your threshold and will climb to the lowest voltage or wattage. If you’ve set your threshold limit to 4 volts, it won’t go below that.
- Free Style: Never have you been able to actually free style your vape, until the MiD One. What I mean by free style is, you can choose what voltage or wattage you want to vape at, at any moment and in real-time. For example, when in Real Time, press the joystick button down (it’ll click like a normal button) and you’ll be in the middle of your threshold. While you’re still vaping and holding the button down, move the joystick up and it will climb in voltage/wattage. I wish I could explain this more to you in words, but it’s tough. Trust me, it’s crazy to actually use this thing and have complete control over it.
Profile Switching
Switching between profiles is quite easy, but again, it relies on a light sequence or in other words, counting blinks. Counting blinks can be a little aggravating and can be made easier – but it’ll do and isn’t really that big of a deal. Although real-time vaping is possibly my favorite thing to do on the MiD, creating profiles and executing for tests is the most fun, informative and specific. Switching between the 4 profile slots is awesome. I’ve come accustomed to leaving my perfected and most used profiles on the left, while my test profiles are on the right. Entering into the profile menu and switching between them is very easy and can be understood from common sense.
In order to activate the profile selection:
- Push joystick to the right, three times.
- The LED will flash once indicating that you are now in profile switching mode. The color of the LED is user defined or purple by default.
- The LED will then flash X amount of times, equivalent to the profile you are currently on.
- Pressing the joystick to the right will cycle between profiles 1 and 2.
- Pressing the joystick to the left will cycle between profiles 3 and 4.
- After pressing the joystick to either side, the LED will flash X amount of times indicating the profile you are now on, pause, then repeat the flashes.
- To accept changing to the profile the LED indicates, simply press center on the joystick for over 1 second, the LED will then turn green and you will exit profile switching and be back in normal vaping mode, with the new profile you selected.
- To abort the selection, press center 3 times rapidly, or don’t touch anything for 30 seconds; both actions will result in a red LED, after which you are back to normal vaping mode, using the profile you were using before.
MiD Cartomizer Cone
The MiD’s Cartomizer Cone performs quite well, has great airflow and holds a good amount of e-liquid (about 4ml). The flavor is very clean tasting when using the cartomizer cone, but makes the flavor also a bit more mild with e-liquids, which is common with cartomizers. It wicked very well and produced a good amount of vapor with it being 2.5Ohm’s, matched with a 4v-5v pulsing profile.
MiD Cell Batteries
The MiD Cell Batteries work great and do not take very long to charge. I’m fine with using the two 16340 batteries, however I would much rather use a single 16650 for my personal liking.
MiD Cell Charger
The MiD Cell Charger looks like good quality, but I wasn’t able to use it on arrival. The charger came with a EU wall connector, which was an easy fix finding a universal one at a local store. The charger is just big enough to accept the two 16340 batteries, so if you don’t have another charger lying around for those ‘650’ sizes, you might need to pick one up (I’m sure most of you APV users have one though). I would also think that once the MiD is finished and released to the public, it will come with a US wall charge connector.
More Information
Body
- Material High grade metal alloy
Dimensions and Weight
- Length 116.6 mm
- Diameter 19.4 mm
- Device Weight 40 gr
Vaping Profiles
- Select between profiles available
- Number of Vaping Profiles 4
- Execution of Vaping Profiles defined in Voltage available
- Execution of Vaping Profiles defined in Wattage available
- Vaping profile Voltage range 0 to 8 V
- Vaping profile Wattage range 0 to 25 W
- Vaping profile Current range 0 to 4 A
- Execution of arbitrary vaping profiles in amplitude available
- Execution of arbitrary vaping profiles in RGB LED color available
- Execution of arbitrary vaping profiles in HSL (hue,
- saturation, luminosity) Yes
Cutoff time
- 12s or less
- (user defined)
Battery Requirements
– Dual Battery Configuration
- Number of Batteries 2
- Battery type 16340
- Diameter 14.5mm to 16.7mm
- Height 33.25mm to 34.75mm
- Maximum discharge current – 4.0A or more
- Chemistry – Any, as long as the maximum discharge current is fulfilled
- Protected – Protected or unprotected, as far long as the maximum discharge current is fulfilled
- Maximum voltage 4.45 or less
- Maximum cut off voltage 3.0V or more
Single Battery Configuration
- Number of Batteries 1
- Battery type 16650
- Diameter 14.5mm to 16.7mm
- Height 66.5mm to 69.5mm
- Maximum discharge current – 4.0A or more
- Chemistry – Any, as far the maximum discharge current is fulfilled
- Protected – Protected or unprotected, as far the maximum discharge current is fulfilled
- Maximum voltage 8.9V or less
- Maximum cut off voltage 3.15V or more
User Interface
- Activation Joystick
- LED RGB LED
Performance
- Average Smoking Losses (approx.) 2%
- Stand by current 40 mA
- Sleep current 12 mA
Conclusion
The Janty MiD One is a beast of a device, but as you can tell from this review, it isn’t for everyone. If you’re not one that likes to fiddle around with your ecig, then I doubt this would be the device for you. However, if you’re one of those that are still on the search for that perfect vape, like to take out a bit of time to get the best you can out of your device and want a bit of fun included, then the MiD is a great route.
The MiD is best explained from Ludo himself – it’s a Photoshop for vapers. In comparison, some users like to use Microsoft paint, because its quick and simple, but the quality of images aren’t up to par with what you can create with Photoshop. And then, Photoshop takes a bit of time to learn, has more customization and the results are the best of quality. Same applies to the MiD device. I’ve had a lot of fun learning to use the MiD and it’s PC software, as well as enjoying the profiles I’ve created, but that doesn’t mean it’s my top of the list PV. I’ll use the MiD when I want to experiment or when I want to precisely match certain settings to my favorite cartomizer or CE series tank.
Though a screen isn’t actually ‘needed’, I would still prefer one on the MiD. Using an LED light sequence is too old school and simple for such an advanced device and I feel if the MiD did include a screen, it would improve the value and use, along with making it to my top used PV. Despite the few erks I have with the MiD, it is truly an awesome electronic cigarette to own. It works great, gives you the ability to completely control your vape in every aspect, and brings fun and knowledge to us hobbyist of vapers.
If you’re interested in the MiD, you can visit www.Janty.com


