

For the longest time I hesitated on giving rebuildable atomizers a shot. Before really knowing anything about them, it seems like the whole ordeal would be confusing and too much tedious work. But surprisingly, rebuildable atomizers are easier than you think.
Note: Rebuildable atomizers are for advanced users only and should not be used by anyone without the knowledge of how to rebuild safely. All rebuildable atomizers should be tested carefully with a multimeter/ohm meter before use. Failure to test properly can result in physical injury. Please use at your own risk.
In this post, I would like to explain the basics to how rebuildable atomizers work and mainly just give you an overview of them.
Like any atomizer, cartomizer or clearomizer, there is always a post or connector that must receive power to work. And, like any electronic, that power must be grounded. With that said, these rebuildable atomizers aren’t any different. They have a center post that receives the power and a post or screw to the side that acts as the ground.
With a standard rebuildable tank atomizer (referred to as RTA), you’ll have a center post for power, then a screw or post off to the side for your ground. One end of your wire will be connected to the power, the middle or bulk of your wire wrapped around the wicking material used, and the other end of your wire will connect to the ground. As you can see in the featured image above, that is the exact setup we are talking about. In the image, you can see that the RTA uses a mesh wick, which sits in a hole that connects to the tank. There are also bottom coil RTA’s, but I haven’t gotten that far yet.
With a standard rebuildable dripping atomizer (referred to as RDA), you’ll have a center post for power and a post to the side for your ground. RDA’s work pretty much the same way, but there is no tank, and your wick will be smaller and used differently. You can wrap the wire around the wick or you can wrap the coil without wick, and place the wick (cotton is commonly used) below the coil and in the drip well area. This type of setup would be what people call a floating coil.
And, then there is a rebuildable dripping atomizer that has 3 posts – the center being your power and the posts beside it are your grounds. This 3 post design gives you the ability to run dual coils. In the image below, you can see where I’m running a dual coil floater setup.
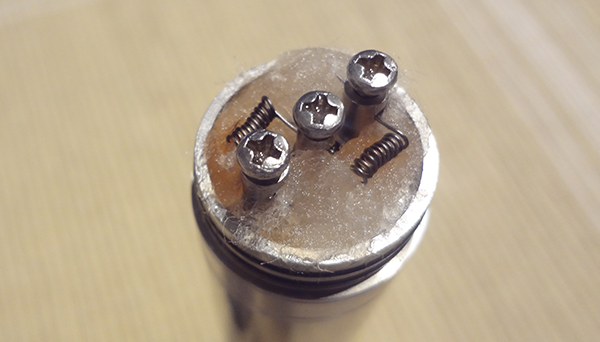
Rebuildable atomizers can be very easy to build, but perfecting them takes work. As you see in the image above, I still have a lot of perfecting to do. How you build these coils depend on the result you’re going to get. In this particular setup in the image above, if I would have made by coils straighter, the wraps without gaps and each coil more alike, my result would probably be better than what I’m receiving now. So, it really depends on how much work you want to put into your setup.
You can’t just jump right out of the box and start building coils, because that isn’t safe. The amount of wraps and the size of your coil plays a huge role on the outcome, so always be sure to test the coils with an ohm meter before putting them to use. These rebuildable atomizers can be very dangerous if you don’t know what you’re doing, so I suggest learning all you can about them before diving in head first. Once you begin to get how these setups work and what is safe to build, then you can start playing with different setups, like different wire, different amount of wraps and different coil configurations.
If you were just like me, hesitating and not too sure about the whole rebuildable atomizer thing, I recommend learning about them and then trying it for the experience in the least. But, as a fair warning, rebuilding will get addicting very quickly!


The kayfun is a good atomizer but you HAVE to know how to set it up, and especially how to fill it. I know I get a lot of people asking how much wicking materials they need but they never seem to read the user manual. Just read the user manual and your kayfun will be blowing clouds in no time.
FYI if you haven’t read the Kayfun user manual, it’s here in html form finally.
Nice bit of information. Thanks!
Nice explanation. This was very very helpful. I couldn’t figure out what type of wire to get and how it was connected to resistance. I have just one question though, why is it necessary to boil the cotton?
commented in the wrong place.. disregard comment
I was able to watch tutorial videos and make non contact coils with my RTA cleito because it didn’t come with a detailed manual. However it does produce vapor, doesn’t spit or produce dry hits. I did notice that it’s not as intense as the factory made coils that are 0.4 ohms, the coils I made are .43 ohms. Am I doing something wrong?